Airstream Caravel/Bambi 16RB Closet Shelving System
Update: I no longer offer this as downloadable STL files – This system is now offered as an easy to install kit, which includes all 3D printed brackets, stainless rods and hardware needed to install.
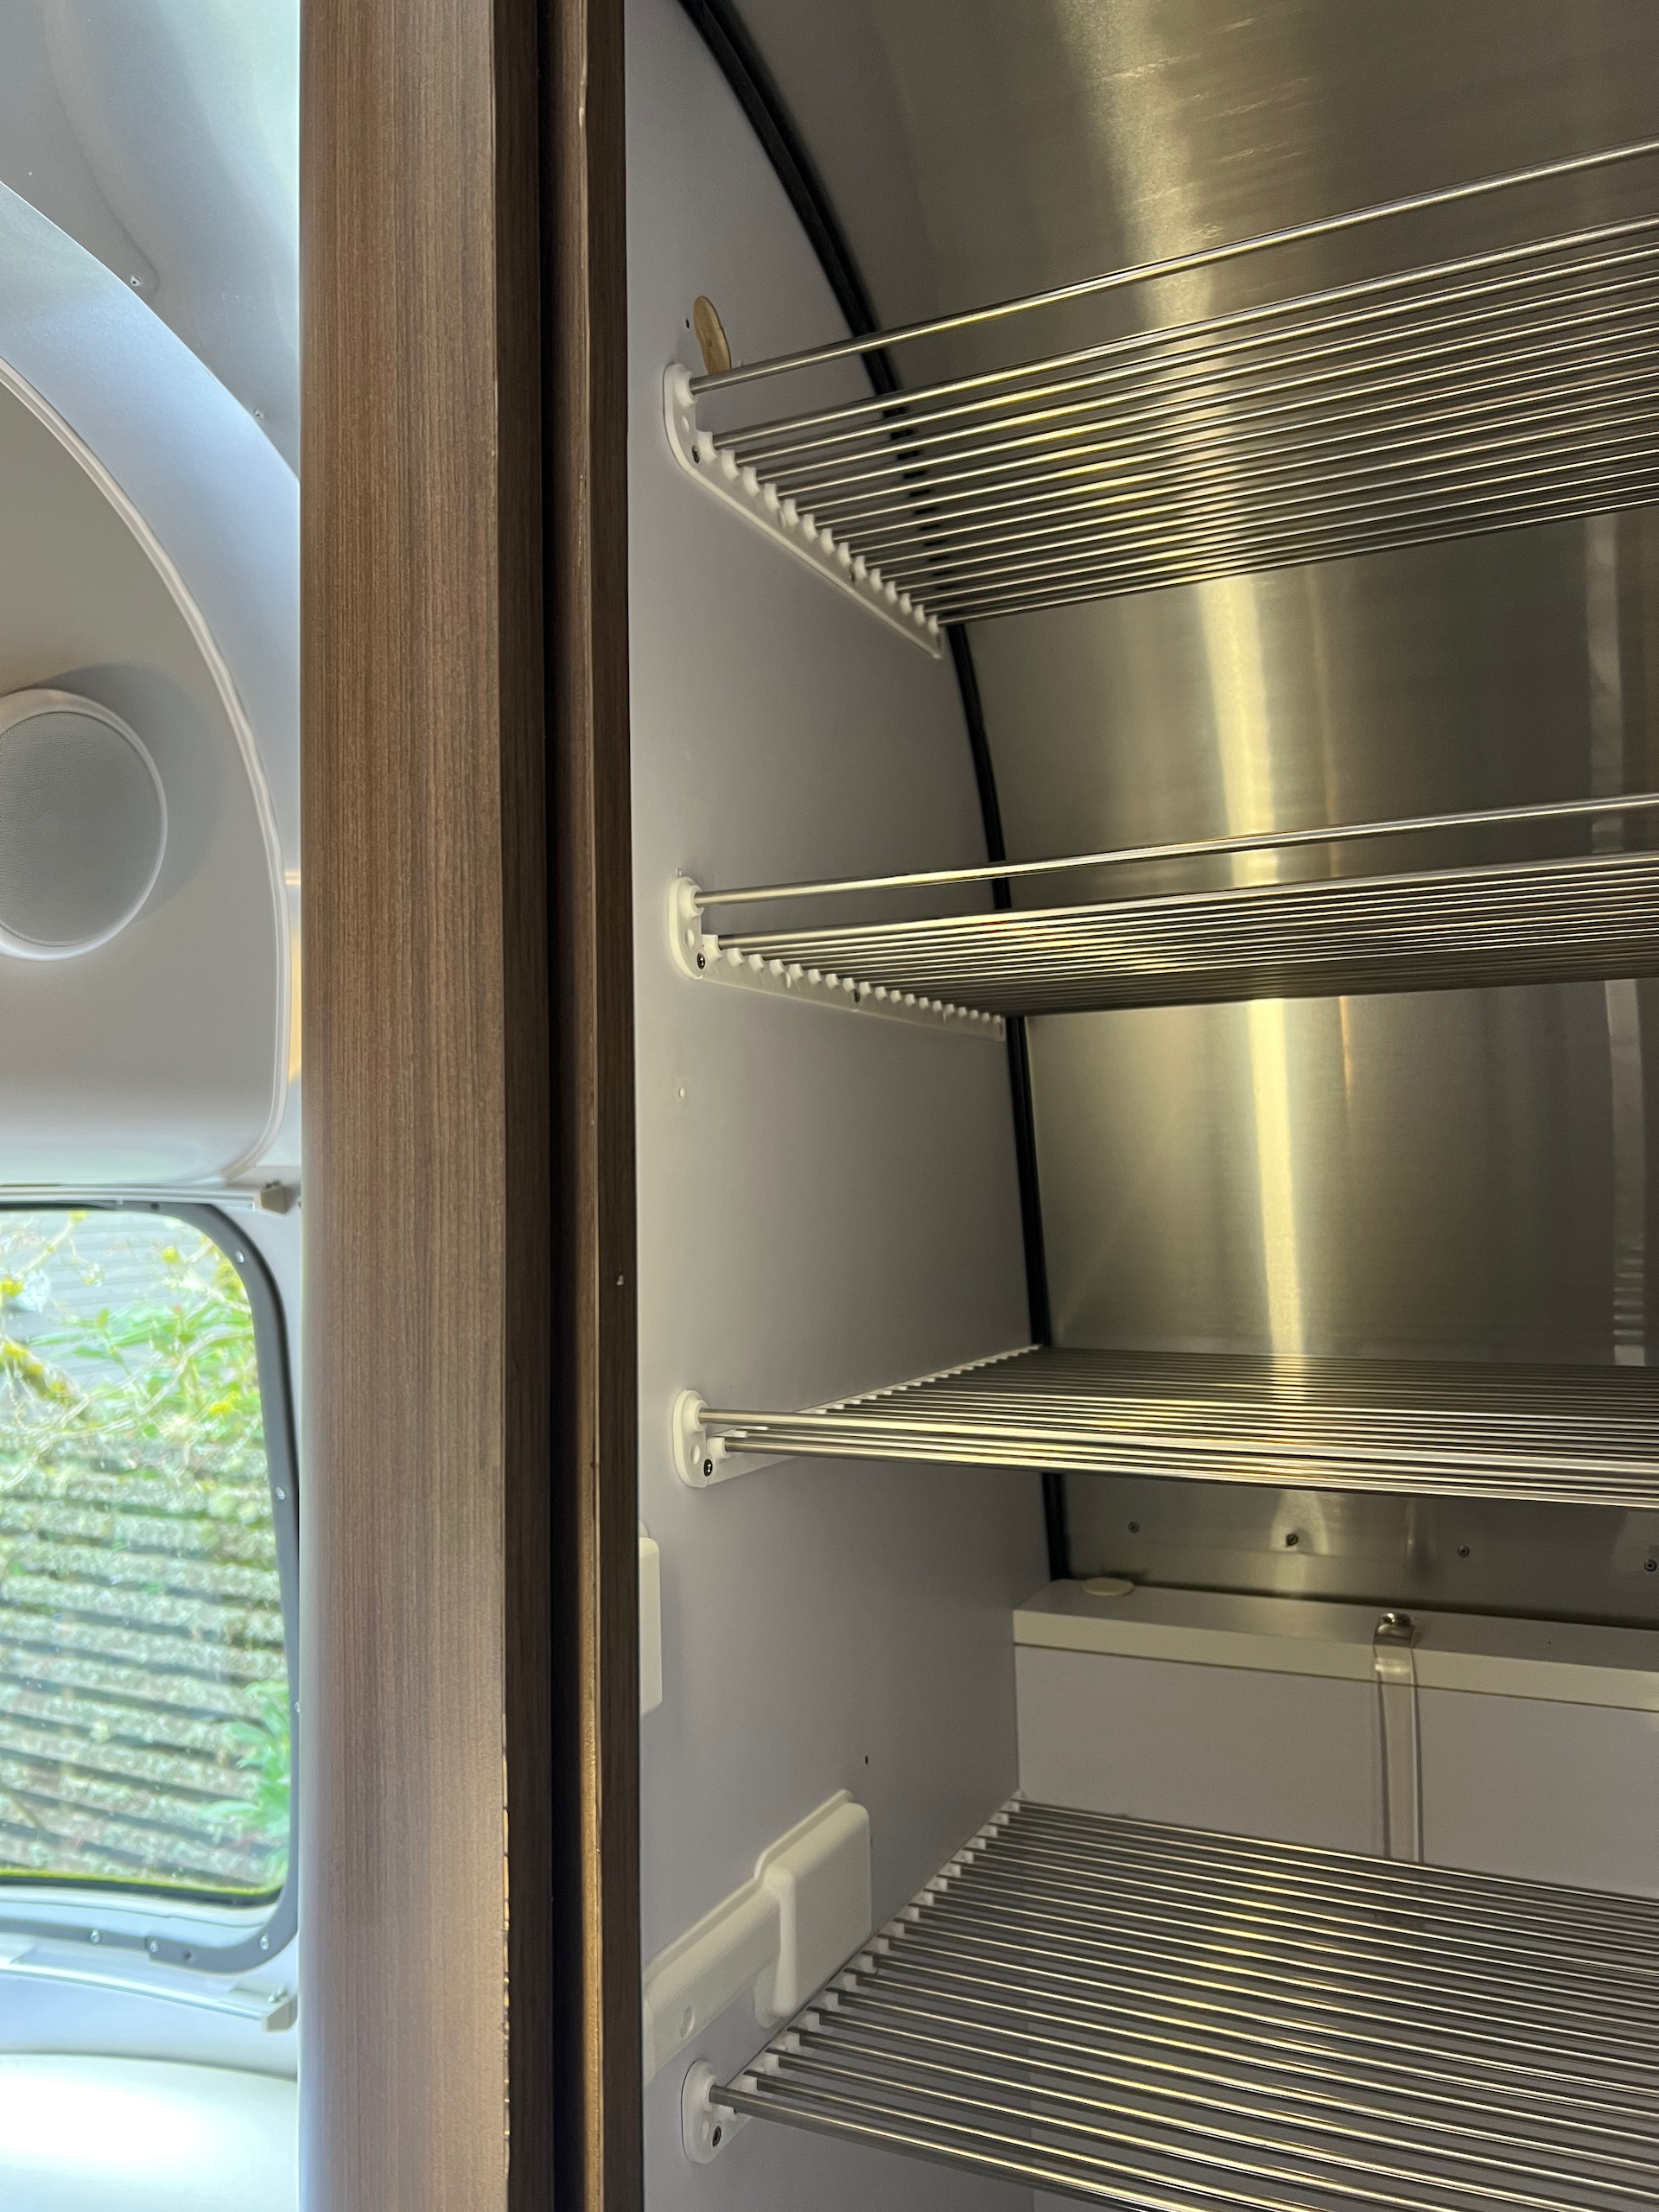
In our 16′ Airstream trailer, there is a tiny, narrow floor to ceiling closet, only about 17″ wide. As weekend warriors, we do not store much clothing there, so adding shelving to it would make much more efficient and convenient storage space.
Last summer, I designed a system that uses the stainless steel rods/tubings taken from those rollup dish drying racks. Here are some highlights of the system.
- Very easy to install, especially the upper shelving.
- Maximize storage space – shelves take very little space.
- Strong and lightweight. they are made from 304 stainless steel rods.
- Shelving do not hinder illumination or air circulation
- Looks surprisingly beautiful. Pictures do not do its justice!

You will need to have access to a 3D printer, to print the brackets. These brackets are pretty easy to print, I printed them on a $250, 5 years old printer.
The upper shelving
Brackets
The brackets for upper shelving are designed to be very flexible – There are designed to be customized to create different shelving depth, this is important as the back wall of our Airstream is curved.

Height Consideration
I managed to fit 4 sets of shelves – depends on how you plan to use the space, you might have a different configuration, here is what went into consideration for mine.
- The bottom shelf needs to accommodate paper towel rolls placed vertically, and my mini Nespresso machine.
- Other shelves should be high enough that those storage baskets can be put in and taken out with ease.
Put it All Together
Here is what it looks like, not bad, isn’t it? It actually looks better in person.

With all the stuff in, still looks great.

Lower Shelving
Brackets
Here are the lower shelving brackets. the idea is the same, but the right side bracket has a built-in ‘fence’ to prevent small pieces of things fall into the gap on the right. Also notice the front railing support on left side is at 45 degree, as it goes on to the stainless steel cable/wire cover piece, which is installed at 45 degree angle.

Height Consideration
I put 2 shelves for the lower part, I wanted the bottom shelf to be tall enough for 1 gallon Crystal Geyser spring water bottle, it’s over ~13″ tall, slightly taller than those 2 liter soda bottles, which would fit as well.
Put it All Together

The small footprint of the system really shines for the lower shelving, It uses every inch of the the available space. See the little fences built into the right side brackets?

This is how the front railings are mounted on the stainless cable cover, using 3M VHB tape.
This was a shelving system I designed last summer,
Material List
| Material | Description | Cost |
| A 1kG roll of quality 3D print PETG filament | For 3d printing all the brackets | $30 |
| Stainless Steel Roll up Dish Drying Rack x 6 | I have tried 4 different brands, this one works the best – rods are in perfect length, no cutting needed for upper shelving. | $96 |
| Stainless Steel Roll up Dish Drying Rack x 6 | Same as the one above in case that one is out of stock | $96 |
| Stainless Steel #6 x 5/8″ Wood Screws | For mounting brackets to the Cabinet wall | $7 |
| Double-sided carpet tape | This is almost required – it eases brackets installation in a confined space significantly and provides additional strength. | $15 |
| 3M Scotch 5952 VHB Tape | For mounting lower shelving front railing left side bracket to cabinet stainless cover piece, you only need about 4″x2″ | $15 |
Tools
| Tool | Description |
| Screw driver with Philips bit | This is the minimal tool needed for installing upper shelving. An electrical drill can make things easier by drilling pilot holes to mount the brackets though. |
| Tubing cutter | $17 – You need a tubing cutter for the lower shelving, because the lower section of closet is narrower than the upper so those stainless tubings need to be cut to size. (Note I have not used this one – I used a vise and a jigsaw with metal blade, but I would not recommend that. |
Installation Tips
First use pencil to draw lines where brackets go on, then use the double sided tape to stick the brackets to be aligned with the lines you drew. snap 2 rods on at front and back, check if they are level. Once you are happy, then drill the pilot holes, then drive the screws on. do not remove the double sided tape, it provides extra strength and you can’t see it anyway.
To find more 3D printable accessories for your Airstream, click here
* This post contains affiliated links – this website gets a small commission when a purchase is made through these links.
14 Comments
Join the discussion and tell us your opinion.
Your idea is brilliant. We have a 25fb and we’re looking for a way to add lightweight shelves in the closet at the end our the bed. Do you have a pattern for the brackets you created that you are willing to share. Next stop buy a 3d printer!
Hi Eileen, sorry I missed comment notification. as I replied to other comments, I no longer offer them as downloadable files. They are designed to fit the width and depth of a Bambi or Caravel 16RB, so they need to be adjusted for your 25 footer.
So bummed these 3D print files are no longer available. You’ve set the bar so high! If you removed with intention are you considering selling the parts or even the files? Please let me know either way!
Hi Matt, sorry I didn’t see your comment until I needed to login to make some update to the post. Thank you for the compliment! Yes this shelving system is now offered as a kit at https://getaerorack.com .
I’m interested in the 3D file for the Bambi closet shelving but the file won’t download. Would you send me a copy. Thanks, Robert
Hi Robert, the files were taken offline, instead I made improvements and offer them as a kit (stainless rods, 3D printed brackets and hardware) at https://getaerorack.com
The shelves look perfect. I would like to download the 3D printer files and duplicate them but the download link goes to https://air16.org not to the files.
Hi Doug, thank you for commenting on the post and sorry I missed notification until I needed to update the post yesterday. I no longer provide the STL files, instead a full kit including stainless rods, 3D printed (PETG) brackets and hardware can be purchased at https://getaerorack.com
HI! I just ordered all 6 shelving pieces but cannot get the 3d print link to work. We pick up our caravel 16rb next Tuesday and this closet hack is brilliant and looks amazing. I would really appreciate a copy of the 3 printing plans if you have them available! thanks:)
Beth
Hi Beth,
Sorry I missed your comment. But looks like Chuck already ordered the kit and had the upper shelvings installed. the adjusted lower brackets are ready and I will send to you guys Monday.
Hi! This is perfect for the 16′ Caravel we pick up next Tuesday. Tried to reach you on Insta and Air Forums as well. The link to the 3D attachments expired. Anyway I can beg those from you? Also what design software do you use for these? What you are making for this and the TV screen look very handy. Want to learn to do that myself!
Hi Chuck,
WordPress somehow stopped sending me comment notification emails, so I didn’t find comments on this post including yours for a long time until I made an update on this post yesterday.
The software I use to create all 3D printed objects is Autodesk’s Fusion 360.
I know you sell as a kit but I’d like to buy the stl file. I just bought a 3D printer and looking for a project.
Hi Garrett,
I no longer have the original STL files – I have modified the original STL files to fit the stainless steel rods with a slightly bigger diameter and wall thickness. so the dry rack rods will not snug fit the brackets anymore.